
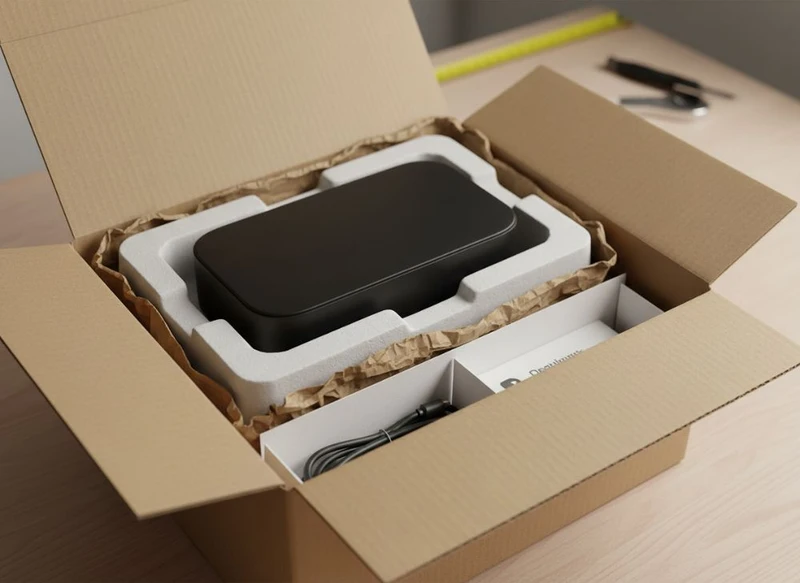
Custom paper box inserts and fillers do two jobs at once: they keep a product stable inside its box and make the unboxing experience feel considered. The right choice depends on the product’s weight, shape, fragility, finish, packing method and the level of presentation your brand needs.
For many products, a simple die-cut cardboard insert or paper filler is enough. Delicate, premium or multi-part items may need a more structured solution, such as moulded pulp, foam or layered compartments. The essential role of custom paper box inserts and fillers is to reduce movement without creating unnecessary material, cost or packing complexity.
Protecting Your Product: Function Over Form
An insert should be specified around the product before its appearance is finalised. A visually attractive insert that allows the item to move, rub against another component or sit under pressure is not doing its primary job.
Start by identifying the risks your product faces inside the closed box:
- Movement: Does the item slide, rotate or lift during handling?
- Impact: Could corners, glass, lids or protruding parts be damaged?
- Surface contact: Will printed, polished or coated surfaces scuff when they touch the insert or another item?
- Weight distribution: Does a heavier component place pressure on a lighter one?
- Orientation: Must the product remain upright or be presented in a particular position?
- Multiple components: Are accessories, instructions, cables, samples or refill items packed together?
A well-designed insert creates a controlled space around the item. It does not necessarily need to grip the product tightly. Excessively tight cut-outs can slow packing, damage delicate finishes and make removal frustrating for the customer. Conversely, a loose cavity can make even a strong outer box feel inadequate.
For products that are transported in an outer shipper, consider the complete packaging system. The retail or gift box, insert, filler and transport carton need to work together. An insert may protect the product inside the presentation box, while the outer carton manages the wider handling environment.
Before placing an order, provide a physical sample where possible, or accurate dimensions including protrusions, closures, handles and accessories. Confirm whether measurements refer to the assembled product, the product in a pouch, or the product with all protective wrapping already applied.
Materials for Inserts: Foam, Cardboard, Moulded Pulp
There is no universally best insert material. The suitable option is the one that provides enough support, matches the intended presentation and fits your material, budget and disposal requirements.
| Material | Best suited to | Main strengths | Points to check |
|---|---|---|---|
| Die-cut cardboard or paperboard | Cosmetics, stationery, small retail goods, gift sets and lightweight items | Printable, adaptable, often efficient to store flat | May not suit very heavy or highly fragile products without added structure |
| Corrugated cardboard | Heavier goods and products needing added cushioning | Stronger structure and useful separation | Edge appearance and thickness may not suit every premium presentation |
| Moulded pulp | Bottles, shaped items and products needing a formed cradle | Contours around products and can create a natural presentation | Tooling, surface texture, fit tolerances and available finishes should be reviewed |
| Foam | Fragile, precision-shaped or high-value items | Can cushion and closely support complex shapes | Confirm material composition, appearance, disposal expectations and compatibility with the product |
| Tissue, paper wrap or paper bands | Surface protection and lightweight presentation | Flexible, simple and useful as a secondary layer | Does not replace a structural insert for products that need immobilising |
Cardboard and paperboard inserts
Cardboard inserts are a practical choice for many branded boxes because they can be die-cut, folded, printed and supplied flat for assembly. Designs range from a basic divider to a folded platform with finger holes, tabs and separate compartments.
Paperboard is particularly useful when the insert is part of the visual presentation. It can match the box design, carry instructions or add a branded reveal beneath the product. However, its grade and construction need to match the product load. A thin insert may bow if the item is too heavy, while an overbuilt design can consume unnecessary board and take longer to assemble.
Moulded pulp inserts
Moulded pulp is useful where the product needs a shaped cradle rather than a flat divider. Its form can hold rounded or irregular items and can be appropriate for products where a tactile, natural-looking material suits the brand direction.
The product must be tested in the actual cavity, especially where there are small tolerances. Check the depth of the recess, ease of removal, edges that may contact sensitive surfaces and the way the insert nests within the box. Specify the intended surface finish early, as moulded pulp does not have the same visual character as printed paperboard.
Foam inserts
Foam is commonly considered where a product needs close support, cushioning or a precise cut-out. It can be effective for delicate objects and sets containing components of different shapes.
It is not automatically the right choice for premium packaging. Foam changes the material feel of the box and may not align with every brand’s environmental or disposal objectives. Ask the supplier to clarify the foam type, thickness, cut style, colour and whether the product requires an additional paper wrap or sleeve to protect its finish.
Designing Die-Cut Cardboard Inserts for Fit
A die-cut insert should make packing straightforward and product removal intuitive. The design needs to account for the product, the box’s internal dimensions and the sequence in which the packer assembles the set.
Useful design features include:
- Product cavities sized for the actual packed product, not an idealised dimension.
- Fold-up walls or locking tabs to create strength without adding separate pieces.
- Finger notches so customers can lift an item out without pulling on a fragile component.
- Dividers that prevent products from touching one another.
- Bridges or collars that hold a product at a desired height.
- Instruction panels placed where they remain visible after the product is removed.
- Locating tabs that stop the insert from shifting inside the box.
Avoid designing solely from a digital product drawing. Small features such as a cap, label seam, rounded base or shrink wrap can change how the item sits. A sample assembly helps identify whether the insert catches on the box walls, whether tabs remain secure and whether the product can be packed consistently.
Allow for production and packing tolerances
An insert cavity should have suitable clearance, but the amount depends on the material and product. Paperboard has folds and board thickness; moulded pulp has a formed profile; foam can compress. A cut-out that looks accurate on screen may be too tight after folding or too loose once the product is wrapped.
Discuss these details with the packaging supplier:
- The product’s length, width, height and weight.
- Whether dimensions can vary between production batches.
- Any labels, sleeves, seals or protective wraps added before packing.
- The desired product orientation in the box.
- Whether staff or customers need to remove the item quickly.
- The order in which each component is packed.
- Whether the box will contain one item or a changing assortment.
A practical insert is often simpler than an elaborate one. Every extra fold, panel or adhesive point should have a clear purpose: retention, separation, presentation or communication.
Visual Appeal: Colour and Print on Inserts
Inserts contribute to the first impression after a box is opened. A printed message under the lid, a contrasting colour beneath the product or a subtle pattern can make the contents feel more intentional without changing the outer box.
Use print strategically. An insert can carry:
- Product-use instructions
- A welcome or thank-you message
- Care and storage guidance
- A brand pattern or colour block
- Product names beneath each compartment
- A QR code where it provides a useful destination
- Reorder or product-range information
Dark colours can make a presentation feel refined, but they may reveal scuffing more readily than lighter uncoated surfaces. Very light inserts can show dust or marks during packing. Highly detailed artwork may be hidden once the product is in place, so reserve it for exposed panels and reveal areas.
If the insert and outer box must look coordinated, choose colours and finishes as a set rather than treating the insert as an afterthought. Your supplier should receive the final artwork, preferred print finish and any requirements for colour consistency. Always review a proof or production sample where visual matching is important.
For products with branded outer packaging, explore custom printed boxes alongside the insert design. The internal structure and external dimensions should be developed together.
Gift Packaging Inserts: Adding a Surprise Element
Gift packaging inserts have a broader role than protection: they set the reveal sequence. The recipient might see a printed lid message, tissue layer, product card or neatly arranged set before reaching the item itself.
A gift insert can add value through organisation rather than excess decoration. Consider:
- A raised platform that positions the product visibly.
- A separate compartment for an accessory, card or sample.
- A removable top layer that reveals a message beneath.
- Tissue paper or a paper band that introduces the product gradually.
- Printed labels that identify items in a multi-product set.
- A reusable divider that keeps components orderly after opening.
The surprise element should not interfere with usability. If a customer needs to dismantle several layers to access a simple product, the experience can feel inconvenient. Likewise, loose decorative items may move around unless the box is packed in a controlled way.
For seasonal sets, corporate gifts or elevated retail presentation, custom gift packaging can be specified with inserts, wraps and internal print as one coordinated format. Confirm how changing product combinations will affect the insert, especially if gift contents vary over time.
Cost Analysis of Different Insert Types
The most economical insert is not always the cheapest unit component. Consider its effect on material use, tooling, storage, packing time, presentation and product protection.
| Insert type | Typical cost drivers | Commercial considerations |
|---|---|---|
| Flat die-cut card | Board grade, print coverage, cut complexity and quantity | Efficient to ship flat; may require folding during packing |
| Folded cardboard insert | Number of folds, tabs, printing and assembly complexity | Can create structure with one material, but needs a practical packing process |
| Corrugated insert | Flute type, board weight, size and die-cut pattern | Useful for strength; may increase box dimensions |
| Moulded pulp tray | Tooling, form complexity, quantity and finishing requirements | Often best considered for repeat formats and a stable product shape |
| Foam cut-out | Foam type, thickness, cut method and cavity complexity | Can provide close support; review material and appearance requirements |
| Loose paper filler | Volume required, colour, material type and packing method | Flexible for varied product sizes but less precise than a fitted insert |
A bespoke insert may involve setup or tooling, depending on its construction. This cost should be evaluated against expected order volumes and how long the product format will remain unchanged. If a product is likely to be redesigned soon, a simpler adaptable filler or adjustable divider may be more sensible.
To compare options fairly, request information based on the same brief: box dimensions, product sample, anticipated order quantity, print requirements and packing method. Also ask whether the insert is supplied flat, pre-assembled or nested, as this affects storage and labour planning.
Do not focus only on the insert price. An insert that is difficult to fold or position may add avoidable handling time. One that is too basic may require extra tissue, void fill or rework to achieve the intended presentation.
Automated Assembly vs. Hand-Packing
The best insert design depends partly on how boxes will be packed. A structure suitable for a low-volume hand-packed gift set may be unsuitable for a faster, repeatable packing line.
Hand-packing considerations
Hand-packed formats offer flexibility for changing products, personalisation and varied gift sets. They can accommodate inserts with multiple folds, tissue wrapping, stickers and carefully arranged components.
However, every manual step introduces the possibility of inconsistency. Reduce this risk by keeping the sequence clear:
- Place the insert in the box.
- Load the heaviest or largest product first.
- Add accessories to their labelled compartments.
- Place tissue, cards or filler in the specified order.
- Inspect that the box closes without pressure.
- Seal or label the box consistently.
Create a physical packing guide with images if multiple people will pack the product. The guide should show correct orientation, fold direction and the required amount of filler.
Automated or semi-automated assembly considerations
Higher-volume operations benefit from inserts that open easily, have reliable locking features and can be loaded consistently. Flat-packed paperboard inserts can be efficient, but complicated folds and small locking tabs may not suit every process.
When assessing an insert for more automated assembly, review:
- Whether the insert arrives flat, pre-folded or pre-glued.
- How reliably it opens into shape.
- Whether it has a clear front and back orientation.
- The amount of force required to seat the product.
- Whether filler can be dispensed consistently.
- Whether the completed box closes at a repeatable height.
- How easily operators can spot a missing component.
Test the actual insert, product and box together under normal packing conditions before committing to a larger run. A design that works for a single sample may behave differently when repeated many times.
The Best Fillers: Shred, Crinkle Paper and Their Purpose
Loose fillers are useful when product sizes vary, when a box contains irregular items or when you need a softer presentation layer. They are generally not a replacement for a fitted insert when a product must remain in an exact position.
Shredded paper
Shredded paper is commonly used to fill empty spaces and cover products in gift boxes. It can create a casual, textured look and is easy to adjust by hand. It is best for lightweight items that do not need precise restraint.
Use it carefully with small components. Tiny items can disappear into the shred, frustrating customers and packers. It may also migrate during transit if the box has excess open space.
Crinkle paper
Crinkle-cut paper has a springier, more dimensional appearance than flat shred. It can cushion light products, elevate items visually and create a fuller presentation with relatively little handling. It works well beneath or around products that have already been individually protected.
The amount matters. Too little filler leaves products exposed; too much can make the product difficult to find or force the lid upward. Define a repeatable fill level for each box size rather than relying on visual judgement alone.
Tissue paper and paper wraps
Tissue is better suited to surface protection and presentation than void filling. It can separate items, wrap polished products and soften the opening experience. Pair it with an insert or more structured filler where stability is required.
Choosing the right filler
Select filler based on its purpose:
- Choose crinkle paper for an elevated gift-box appearance and light cushioning.
- Choose shredded paper for adaptable void filling around lightweight products.
- Choose tissue for wrapping, separating and protecting surfaces.
- Choose a fitted insert when orientation, spacing or product security is essential.
- Combine a structural insert and a light filler when both retention and a softer visual finish are needed.
Avoid overfilling boxes simply to make them feel more substantial. Excess material can obscure the product, complicate packing and create a less tidy reveal. It is usually better to select a box size and insert depth that suit the product from the outset.
A Practical Specification Checklist
Before approving custom paper box inserts and fillers, confirm the following:
- Final internal box dimensions
- Product samples and accurate packed-product measurements
- Product weight and fragile areas
- Number of components in each set
- Required product orientation
- Insert material, thickness and finish
- Print artwork and visible message areas
- Whether the insert is supplied flat or assembled
- Hand-packing or automated assembly requirements
- Expected storage conditions and handling route
- Intended disposal or material preferences
- Sample approval process before full production
Also verify any labelling, material, product-safety or market-specific requirements that apply to your product and sales channels in South Africa. Requirements can vary by product category and should not be assumed from the packaging format alone.
The right insert is one that protects the item, supports efficient packing and reinforces the intended brand experience without making the box unnecessarily complex. When developing a new format, begin with the actual product and packing process, then refine the material, cut-out and print details around those practical needs. For a packaging partner’s background and capabilities, see about XGolden Print; product labels or sealing details can also be coordinated with custom stickers.
